Roomba setup process
A Roomba robotic vacuum cleaner may be set up without much difficulty. Follow step-by-step strategies to get you going:
- Take the vacuum out of its container and check that all of its parts are there. The Roomba itself, the docking station, a power cord, virtual wall barriers (if necessary), and user manuals are among the regular parts.
- Connect the docking station’s power wire to an electrical outlet to start charging the Roomba. Place the docking station with enough space surrounding it against a wall. To charge its battery, place the Roomba on the docking station. It may take numerous hours for the battery to copiously charge, so give it some time.
- Make sure the area you want the Roomba to clean is clear before you turn it on. Eliminate any cords, loose items, or other obstructions that could obstruct the Roomba’s motion. Although Roombas have sensors, it’s always a good idea to remove any possible threats.
- Make sure the dustbin is empty and securely fastened in the Roomba before starting the cleaning process. Find the Roomba’s power button, which is usually on the top, and press it to turn it on.
- Find an appropriate spot for the docking station before setting it up. It should ideally be positioned next to a wall so the Roomba can readily access it. Make sure the Roomba has enough space to dock and de-dock from the station.
- Start the cleaning procedure by pressing the Roomba’s “Clean” button or, if one is provided, the remote control that comes with it. The Roomba will start cleaning and use its in-built sensors to move around your house.
- Keep an eye on the Roomba while it’s cleaning to make sure everything is running well. As needed, empty the trash, and refer to the user handbook for troubleshooting instructions if the Roomba has any problems or malfunctions.
- The Roomba will make an automatic effort to return to the docking station after its cleaning cycle is complete or if the battery is getting low. Make sure the docking station is in the accurate dwelling and that there is a vibrant track to it.
Roomba login procedure details
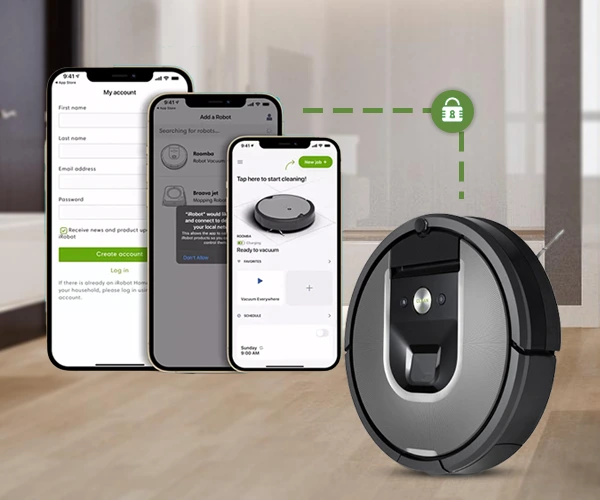
The Roomba app setup and usage instructions are as follows:
- On your mobile’s app store search and transfer the application.
- As soon as it has been fixed, unveil the app on your smartphone.
- You must have an iRobot account. Usually, this entails supplying an email address and making a password.
- To set up your Roomba robot, follow the in-app instructions that are displayed on-screen. In order to do this, you might need to set up your robot’s settings and connect to your Wi-Fi network.
- Once your Roomba robotic vacuum cleaner is set up, you may use the app to plan cleaning sessions, start, stop and check on the robot’s condition.
- Make that your Wi-Fi network is up and running and that you have access to the SSID (network name) and Wi-Fi key (password) for the network.
- Ensure that your Roomba is plugged into its charging dock or has a full charge.
- Install the iRobot Home app.
- Unveil the iRobot Home app and sign in with your existing iRobot account or generate a new one.
- Choosing your Roomba model will start the setup procedure.
- The app will urge you to link your Roomba to Wi-Fi during setup. Your Wi-Fi network must be chosen, and the network password must be entered.
- Your Roomba will attempt to join to your Wi-Fi network once you have input the Wi-Fi credentials. Hold off until the app indicates a successful connection.
- You may change settings after a successful Wi-Fi connection, including cleaning schedules and Roomba naming.
- To make certain everything is functioning as it ought, start a cleaning session using the app. Through the app, you can remotely monitor and manage your Roomba as well.
What to do when irobot not connecting to wifi
You can attempt the following troubleshooting procedures if your Roomba wont connect to wifi:
- Make sure your Wi-Fi network operates at 2.4GHz. Typically, 5GHz networks are not supported by Roomba models. Assume your network is up and running and not hidden (SSID broadcast should be enabled).
- To ensure a good signal while configuring your Roomba, put the devices near together.
- Switching your Roomba on and off will perform a power cycle. Your Roomba may be turned off and back on by holding the CLEAN button.
- To reconnect roomba to wifi rebooting the router can sometimes hit connectivity difficulties.
- Verify that the mobile device you are using to configure the Roomba is joined to the same Wi-Fi network that you wish to join.
- Remove your Roomba from your account in the iRobot Home app before attempting to add it again as a new device. Sometimes, this can fix connectivity problems.
- As a final option, you may reset your Roomba to factory settings and configure it all over again. For details on how to do a factory reset, consult your Roomba’s user manual or iRobot support materials.
- Ensure that the most recent firmware is installed on your Roomba. Firmware updates can sometimes fix connection problems. The iRobot Home app may be used to check for firmware upgrades.
- Verify the security settings on your Wi-Fi network. Make sure that the Roomba can connect to the network without being prevented by any firewall or security settings.
iRobot Roomba i7 setup
In order to configure your iRobot Roomba setup, take your Roomba i7 out of the packaging and charge it on the included charging station. Create an account after downloading the iRobot Home app to your smartphone. Start by opening the app and choosing “Add Robot” to configure. To join your smartphone to the Roomba’s Wi-Fi network, follow the directions. When asked, enter the password for your home Wi-Fi network and go back to the app. The app will walk you through mapping your house and establishing cleaning preferences once you’re connected. Once everything is set up, place the Roomba i7 on the charging station and let it update if required. The app now allows you to schedule and manage cleaning sessions for your Roomba i7.
How to reset Roomba i7
The Roomba i7’s “Clean” button may be found there. For about 20 seconds, clutch down the “Clean” button while insistent and crofting it. When the Roomba i7 turns off, release the button. Press the “Clean” button once more after a little delay to turn the Roomba on. Now that the Roomba i7 has been returned to factory settings, you may configure it once again using the iRobot Home app.